All About Onions

Onions are a true kitchen staple, adding a foundational flavour to countless dishes around the world. But have you ever experienced the crisp, pungent taste of one pulled straight from your own garden? Growing your own onions is a deeply rewarding process, and with a little guidance, it’s something any gardener can achieve.

A Brief History of the Humble Onion

The onion, known botanically as Allium cepa, is one of the oldest cultivated vegetables in the world. It belongs to the same plant family as garlic, leeks, chives and shallots. While its exact wild origins are uncertain, botanists believe it likely originated in Central Asia. Archaeological and written records suggest that onions were being cultivated in ancient Egypt as far back as 3500 BC. They were not just food; they were worshipped for their spherical shape and concentric rings, which were thought to symbolise eternal life.

From ancient civilisations to medieval kitchens and modern-day allotments, the onion has remained a constant. Its ability to be stored for long periods made it an essential crop, providing vital nutrition and flavour when other fresh produce was scarce. Today, it’s hard to imagine a cuisine that doesn’t rely on the onion’s unique ability to build a rich and savoury base.

Onion Varieties for Your Garden

When you decide to grow onions, you’ll find there are many varieties to choose from. They are typically categorised by colour—red, white and yellow (or brown)—and can be grown either from seeds or from “sets,” which are small, immature bulbs. For beginner gardeners, starting with sets is often the easiest and most reliable method.

Here are some excellent varieties that perform well in the UK climate:

Yellow/Brown Onions

These are the classic all-rounders, perfect for cooking. They have a strong flavour that mellows beautifully when sautéed, roasted, or caramelised.

  • ‘Sturon’: A very popular and reliable variety. It produces firm, globe-shaped bulbs with golden-brown skin and stores exceptionally well. It’s a great choice for a main crop.
  • ‘Setton’: An improved version of ‘Sturon’, offering even better yields and excellent storage potential. It has good resistance to bolting (flowering prematurely).
  • ‘Stuttgart Giant’: A traditional favourite that produces large, slightly flattened bulbs. It’s known for its mild flavour and is good for both cooking and slicing raw into salads.

Red Onions

Known for their vibrant colour and milder, sweeter taste, red onions are wonderful in salads, salsas, and sandwiches. They also add a lovely colour to cooked dishes.

  • ‘Red Baron’: This is one of the most reliable red onion varieties for the UK. It produces deep red, globe-shaped bulbs with a crisp texture and good flavour. It also stores well for a red onion.
  • ‘Electric’: A fast-maturing variety that produces flat-topped, vivid red bulbs. It’s best used relatively quickly after harvesting as it doesn’t store as long as other types.

White Onions

White onions have a sharper, more pungent flavour when raw but become sweet when cooked. They are a staple in many Mexican dishes.

  • ‘Snowball’: A classic white onion that produces round, pure-white bulbs. It has a mild flavour and is best used fresh from the garden, as it has a shorter storage life.

How to Grow Onions

Growing onions is a straightforward process. You can start them from seed for a cheaper but more labour-intensive option, or from sets for an easier, quicker crop. We’ll focus on growing from sets, as it’s the most common method in the UK.

When and Where to Plant

  • Autumn Planting: Some hardy varieties, like ‘Radar’ and ‘Electric’, can be planted in September or October. This gives them a head start, resulting in an earlier harvest the following summer.
  • Spring Planting: The main planting season for onion sets is from March to April, once the soil has warmed up and is workable.

Onions need a sunny, open spot with well-drained soil. They do not thrive in heavy, waterlogged clay. Before planting, prepare the bed by removing any weeds and stones. Dig in some well-rotted organic matter, like compost, to improve soil structure and fertility. A week or two before planting, rake in a general-purpose fertiliser. Onions prefer a soil pH between 6.0 and 7.0.

How to Plant Onion Sets

Planting your sets is simple. Follow these steps for success:

  1. Prepare the Sets: Gently separate the small bulbs.
  2. Mark Your Rows: Use a string line to create straight rows. This makes weeding much easier later on. Space your rows about 25-30cm (10-12 inches) apart.
  3. Plant the Bulbs: Push each set into the soil so that just the very tip is showing above the surface. If your soil is firm, you may need to use a trowel to make a small hole for each one.
  4. Spacing: Space the sets about 10-15cm (4-6 inches) apart within the row. This gives them enough room to swell into full-sized bulbs.

Birds can sometimes be a problem, as they may pull the newly planted sets out of the ground. Covering the bed with horticultural fleece or netting for a few weeks until the roots are established can prevent this.

Caring for Your Onion Crop

Once planted, onions are relatively low-maintenance, but a little care will ensure a healthy, heavy crop.

Watering

Water your onions regularly, especially during dry spells. The soil should be kept consistently moist but not waterlogged. When the bulbs start to swell, consistent watering is crucial. Stop watering completely once the onions are fully grown and the foliage starts to turn yellow and fall over, as this helps them to mature and prepare for storage.

Weeding

It is very important to keep your onion patch weed-free. Onions have shallow roots and do not compete well with weeds for water and nutrients. Weed carefully by hand or with a hoe, taking care not to damage the delicate onion bulbs just below the surface.

Feeding

If you prepared the soil well before planting, your onions may not need additional feeding. However, if growth seems slow, you can give them a boost in early summer with a high-nitrogen liquid feed, like a sulphate of ammonia fertiliser. Avoid feeding them after mid-summer, as this can encourage soft growth that won’t store well.

Pests and Diseases

Onions are generally robust, but there are a few issues to watch out for:

  • Onion White Rot: This is a serious fungal disease that causes the leaves to turn yellow and wilt, and a white, fluffy mould appears on the base of the bulb. There is no chemical cure, and the fungus can remain in the soil for many years. If you find it, you must remove and destroy affected plants and avoid growing onions, leeks, or garlic in that spot for at least eight years.
  • Leek Rust: This appears as bright orange pustules on the leaves. It’s more common in wet weather. While it looks alarming, it rarely affects the bulb’s development. Ensure good air circulation and avoid overcrowding to reduce the risk.
  • Onion Fly: The larvae of this fly burrow into the bulbs, causing them to rot. You can protect your crop by covering it with insect-proof mesh from May onwards.

Harvesting and Storing Your Onions

Your onions will tell you when they are ready for harvesting. The leafy tops will start to turn yellow and flop over. This usually happens in late summer, from August to September.

How to Harvest

On a dry day, gently lift the bulbs from the soil using a garden fork. Be careful not to spear them! You can leave them on the surface of the soil for a day or two to dry in the sun, but bring them under cover if rain is forecast.

How to Dry and Cure Onions

Properly drying, or “curing,” your onions is the secret to making them last for months.

  1. Find a Dry Space: Lay the onions out in a single layer on racks or trays. An airy greenhouse, a sunny conservatory, or a well-ventilated shed is ideal. Make sure they are not touching, as this allows air to circulate freely.
  2. Let Them Cure: Leave them to dry for two to three weeks, or until the foliage is dry and papery and the outer skins are crisp.
  3. Prepare for Storage: Once cured, you can trim the roots off the bottom of the bulb and shorten the dried tops. You can either cut the tops down to about 2.5cm (1 inch) or leave them long if you plan to create a traditional onion plait.

How to Store Onions

Store your cured onions in a cool, dry, and dark place. Net bags, old tights, or plaited strings hung from the ceiling are perfect as they allow for good air circulation. Avoid storing them in plastic bags, as this will cause them to rot. Do not store them with potatoes, as onions release ethylene gas which can cause potatoes to sprout prematurely.

Properly stored, maincrop varieties like ‘Sturon’ and ‘Red Baron’ can last well into the following spring.

Using Your Home-Grown Onions

There is nothing more satisfying than cooking with produce you have grown yourself. The flavour of a freshly harvested onion is often more intense and vibrant than anything you can buy. Here are a few simple recipe ideas to make the most of your crop:

  • Classic French Onion Soup: The ultimate celebration of the onion. Slowly caramelise thinly sliced onions for at least 40 minutes until they are deeply brown and sweet, then simmer in a rich beef broth. Top with a crusty slice of bread and melted Gruyère cheese.
  • Caramelised Onion Tart: A simple yet elegant dish. Spread deeply caramelised onions over a sheet of puff pastry, crumble over some goat’s cheese or feta, and bake until golden.
  • Simple Onion Bhajis: Mix thinly sliced onions with a spiced gram flour batter and fry in small spoonfuls until crisp and golden brown. A perfect snack or starter.
  • Roasted Onions: Peel and halve your onions, toss them with olive oil, salt, and a sprig of thyme, and roast them in a hot oven until tender and sweet.

Your Garden, Your Kitchen

Growing onions is a journey that connects you to the food you eat. From the simple act of pushing a small set into the soil to the satisfaction of plaiting your cured crop for winter storage, it’s a process that is both grounding and fulfilling. You can bring a fundamental ingredient from your garden straight to your plate, adding flavour and nourishment to your meals. We hope this guide has encouraged you to give it a try.

Further Reading: Your Complete Guide to Growing Garlic, All About Pumpkins, What to Do in Your Vegetable Garden in September

Your Complete Guide to Growing Garlic

Growing your own garlic is one of the most rewarding experiences in gardening. This versatile bulb not only adds incredible flavour to your cooking but also offers impressive health benefits and stores beautifully for months. Whether you’re a beginner gardener or looking to expand your vegetable plot, garlic is surprisingly easy to grow and incredibly satisfying to harvest.

Garlic belongs to the allium family, which includes onions, leeks and chives. Unlike many vegetables that grow from seeds, garlic grows from individual cloves planted in autumn for harvest the following summer. This means you’ll need patience, but the results are absolutely worth the wait.

What Is Garlic?

Garlic (Allium sativum) is a hardy perennial plant that produces underground bulbs divided into segments called cloves. Each bulb typically contains 8-12 cloves, depending on the variety. The plant produces long, flat leaves that grow from the base and sometimes develops a flower stalk called a scape.

Nutritionally, garlic packs a powerful punch. Fresh garlic contains vitamin C, vitamin B6, and manganese, along with compounds like allicin that give it its distinctive smell and potential health benefits. Raw garlic provides the highest concentration of these beneficial compounds, though cooking garlic still retains many nutritional properties.

The flavour of homegrown garlic far exceeds anything you’ll find in supermarkets. Fresh garlic has a complex, robust taste that varies between varieties—from mild and sweet to fiery and pungent. Growing your own ensures you get the freshest possible bulbs without any chemical treatments.

How to Grow Garlic in the UK

Growing garlic in the UK requires understanding our climate and timing your planting correctly. Garlic needs a cold period (vernalisation) to form proper bulbs, making autumn planting essential for success.

When to Plant
Plant garlic cloves between October and December, with November being ideal. This timing allows the cloves to establish roots before winter whilst ensuring they receive enough cold weather to trigger bulb formation. Avoid planting too early, as warm soil can cause premature sprouting.

Preparing Your Soil
Garlic thrives in well-drained, fertile soil with a pH between 6.0 and 7.0. Heavy, waterlogged soil will cause bulbs to rot, so improve drainage by adding compost or gritty sand if needed. Choose a sunny location that receives at least six hours of direct sunlight daily.

Planting Method
Separate bulbs into individual cloves just before planting, keeping the papery skin intact. Plant cloves pointed end up, 2.5cm deep and 10-15cm apart in rows spaced 30cm apart. In heavier soils, plant slightly shallower to prevent rotting. Cover with soil and mark your rows clearly.

Garlic Varieties: Choosing What to Grow

Selecting the right garlic variety makes an enormous difference to your success. You can choose between hardneck and softneck varieties, each with distinct characteristics.

Hardneck Varieties
Hardneck garlic produces flower stalks (scapes) and typically performs better in colder climates. Popular UK varieties include:

  • Lautrec Wight: A reliable French variety with strong flavour and good storage qualities
  • Chesnok Red: Purple-striped bulbs with complex, rich flavour
  • German Red: Hardy variety with excellent cold tolerance

Hardneck varieties often have more complex flavours but shorter storage life than softneck types.

Softneck Varieties
Softneck garlic rarely produces flower stalks and generally stores longer. Good options include:

  • Solent Wight: Specifically bred for UK conditions with reliable performance
  • Early Purple Wight: Harvests earlier with attractive purple-tinged bulbs
  • Cristo: Large, mild bulbs perfect for roasting

Softneck varieties typically store better and have milder flavours, making them excellent for beginners.

Elephant Garlic
Despite its name, elephant garlic (Allium ampeloprasum) is actually more closely related to leeks. It produces enormous bulbs with very mild flavour, perfect for roasting whole or using in large quantities.

Caring for Your Garlic

Garlic requires minimal care once established, but attention to a few key areas ensures healthy growth and maximum bulb size.

Watering
Water regularly during spring growth but avoid overwatering, which can cause fungal problems. Stop watering completely once leaves begin yellowing in summer—this helps bulbs cure properly.

Feeding
Apply a balanced fertiliser in early spring when shoots appear. Avoid nitrogen-rich feeds after May, as this encourages leaf growth at the expense of bulb development.

Weed Control
Keep garlic beds weed-free, as garlic doesn’t compete well with other plants. Shallow hoeing works well, but avoid disturbing the bulbs. Mulching with compost helps suppress weeds whilst retaining moisture.

Managing Scapes
Remove flower stalks (scapes) from hardneck varieties as soon as they appear. This directs the plant’s energy into bulb development rather than flower production. Scapes are edible and make excellent additions to stir-fries.

Common Problems and Solutions

Rust
Orange spots on leaves indicate garlic rust, a fungal disease common in humid conditions. Improve air circulation, avoid overhead watering, and remove affected leaves. Severely infected plants may need destroying.

White Rot
This soil-borne fungus causes yellowing leaves and white, fluffy growth around bulbs. Unfortunately, there’s no cure—remove affected plants immediately and avoid growing alliums in that area for several years.

Bulb Mites
Tiny white mites can damage stored bulbs. Ensure good air circulation during drying and storage, and inspect bulbs regularly.

Poor Bulb Formation
Small bulbs usually result from planting too late, inadequate cold exposure, or poor growing conditions. Plant earlier next season and improve soil drainage and nutrition.

Harvesting and Storing Garlic

Timing your harvest correctly determines how well your garlic stores and tastes.

When to Harvest
Harvest when the bottom third of leaves have turned brown but the top leaves remain green—typically July to August. Lift one test bulb to check development; cloves should fill their skins completely.

Harvesting Method
Carefully lift bulbs with a fork, brushing off excess soil but leaving roots and leaves attached. Handle gently to avoid bruising, which reduces storage life.

Curing Process
Cure garlic in a warm, dry, well-ventilated area for 2-3 weeks. Spread bulbs on racks or tie in bunches. Proper curing is essential for long-term storage—inadequately cured garlic will spoil quickly.

Storage Options
Once cured, trim roots and cut stems to 2.5cm above the bulb. Store in mesh bags, wooden crates, or plait into traditional garlic strings. Keep in a cool, dry place with good air circulation. Properly stored garlic lasts 6-9 months.

Using Your Homegrown Garlic

Fresh garlic transforms ordinary dishes into extraordinary meals. The flavour of homegrown garlic peaks about four weeks after harvest, developing complexity that supermarket garlic simply cannot match.

Cooking Tips

  • Crush garlic with the flat side of a knife to release more flavour
  • Add raw garlic at the end of cooking to preserve its bite
  • Roast whole bulbs for sweet, mellow flavour
  • Remove the green germ from older cloves to reduce bitterness

Recipe Ideas
Transform your harvest into delicious preserved garlic. Make garlic-infused oil for drizzling over vegetables, create garlic butter for bread, or pickle whole cloves for a tangy condiment. Garlic scapes make excellent pesto when blended with olive oil, nuts, and cheese.

Saving Seed Garlic
Save your best bulbs for next year’s planting. Choose the largest, healthiest bulbs from your harvest and store them carefully until autumn planting time.

Start Your Garlic Growing Journey

Growing garlic rewards patience with incredible flavour and the satisfaction of harvesting something truly special from your garden. The minimal effort required makes garlic perfect for busy gardeners, whilst the long storage life means you’ll enjoy your harvest for months.

Start small with just a few bulbs of different varieties to discover your preferences. Order seed garlic from reputable suppliers in September for October planting, and you’ll be harvesting your own aromatic bulbs next summer.

Your first successful garlic harvest will convince you that this ancient crop deserves a permanent place in your garden. The superior flavour, impressive health benefits, and simple growing requirements make garlic an essential addition to any vegetable garden.

Further Reading: Why Growing Your Own Food Has Never Been More Important, The Importance of Growing Your Own Food, The Autumn Vegetable Garden,

What to Do in Your Vegetable Garden in September

September marks a gentle shift in the garden. The intense heat of summer begins to fade, replaced by the golden light and cooler air of early autumn. For vegetable gardeners, this isn’t an end but a transition, a busy and rewarding month filled with harvesting the last of the summer crops and planting for the cooler months ahead. It’s a time of abundance and preparation, offering a unique opportunity to extend your growing season well into winter.

This guide will walk you through the essential tasks for your vegetable garden this September. Discover which crops are ready to be harvested, what seeds you can still sow for a winter bounty and the key maintenance jobs that will set your garden up for success next spring. Let’s get our hands dirty and make the most of this beautiful gardening month.

Key Jobs for September

September is a month of transition, blending the final summer harvests with preparations for autumn and winter. Keeping on top of a few key tasks will ensure your plot stays productive and healthy.

Tidying and Clearing

As summer crops like courgettes, beans and peas finish producing, it’s time to clear them away. Removing old, spent plants is crucial for a few reasons. It prevents pests and diseases from overwintering in the decaying foliage and frees up valuable space for autumn and winter crops.

When you remove the plants, add any healthy material to your compost heap. Avoid composting anything that shows signs of disease, like mildew or blight, as the spores can survive and infect next year’s crops. For legumes like peas and beans, it’s a good practice to cut the stems at the base and leave the roots in the ground. These roots contain nitrogen-fixing nodules that will enrich the soil as they break down, providing a natural fertiliser for the next plants you grow in that spot.

Preparing Beds for Winter

Once a bed is clear, don’t leave it empty. Bare soil is vulnerable to erosion from winter rain and can lose valuable nutrients. You have a couple of excellent options for protecting and improving your soil over the colder months.

One of the best things you can do is sow a green manure. These are fast-growing plants like phacelia, winter tares, or grazing rye that you grow specifically to improve the soil. They act as a living mulch, suppressing weeds and protecting the soil structure. When you dig them back into the ground in spring, they add organic matter and nutrients, boosting your soil’s health for the coming season.

Alternatively, you can cover the empty beds with a thick layer of well-rotted manure, garden compost, or even a layer of cardboard topped with leaves. This mulch will protect the soil, prevent weed growth, and allow the worms and other soil life to slowly incorporate the organic matter, leaving you with beautifully fertile soil come spring.

Pest and Disease Control

The cooler, damper conditions of early autumn can encourage slugs and snails. Be vigilant around your new seedlings and leafy greens. You can use wildlife-friendly slug pellets, wool pellets, or create beer traps to protect your plants.

Also, keep an eye out for fungal diseases like downy mildew on your brassicas and powdery mildew on any remaining courgette or squash plants. Good air circulation is key, so ensure your plants aren’t overcrowded. Remove any affected leaves promptly to prevent the disease from spreading.

What to Sow in September

While it might feel like the growing season is winding down, September is the perfect time to sow a variety of hardy vegetables that will see you through the autumn and winter.

Winter Salads

Don’t say goodbye to fresh salads just yet. Many varieties thrive in cooler weather.

  • Lettuce: Sow hardy winter varieties like ‘Arctic King’ or ‘Winter Density’ directly into the ground or in pots. A cloche or cold frame will offer extra protection and extend your harvest.
  • Spinach: September is an ideal time to sow spinach for an autumn and winter crop. It grows well in cooler temperatures and can be harvested as individual leaves.
  • Rocket: This peppery leaf is incredibly fast-growing and hardy. Sow a row now, and you could be harvesting it in just a few weeks.

Hardy Greens and Brassicas

These vegetables are staples of the winter garden and should be planted now for a continuous supply.

  • Spring Cabbage: Plant out young spring cabbage plants that you sowed earlier in the summer. Choose a sunny, sheltered spot and firm the soil around them well to prevent wind rock.
  • Kale: If you haven’t already, you can still sow kale for a late crop of delicious and nutritious leaves.
  • Swiss Chard: A beautiful and productive crop, Swiss chard can be sown in September for harvesting through autumn and into winter in milder areas.

Onions and Garlic

Early autumn is the traditional time to get your onion sets and garlic cloves in the ground.

  • Winter Onions: Plant onion sets like ‘Radar’ or ‘Electric’ for an early crop next summer. Plant them in well-drained soil in a sunny spot, with just the tips showing above the surface.
  • Garlic: Choose a hardneck variety for the best results when planting in autumn. Break the bulb into individual cloves and plant them about 15cm apart and 5cm deep, with the pointy end facing up.

What to Harvest in September

September is a month of great abundance, where you can enjoy the fruits of your summer labour. Many crops will be at their peak, offering a delicious reward for your hard work.

Summer Favourites

The last of the summer crops are often the sweetest, having ripened in the long sunny days.

  • Tomatoes: Continue to harvest tomatoes as they ripen. As the month progresses and temperatures drop, you can pick any remaining green tomatoes and ripen them indoors on a sunny windowsill.
  • Courgettes and Squash: Keep picking courgettes regularly to encourage the plant to produce more. Winter squashes, like butternut and pumpkins, should be ready now. You’ll know they’re ripe when the skin has hardened, and the stem is dry.
  • French and Runner Beans: Harvest beans regularly to ensure a continuous supply. If you leave the pods on the plant for too long, it will stop producing new ones.

Root Vegetables

Many root vegetables planted in spring and early summer will be ready for lifting.

  • Maincrop Potatoes: Wait for the foliage to turn yellow and die back before lifting your maincrop potatoes. Choose a dry day and use a garden fork to carefully dig them up. Let them dry on the soil surface for a few hours before storing them in a cool, dark, and frost-free place.
  • Carrots and Beetroot: You can continue to harvest carrots and beetroot as you need them. They can be left in the ground, but be mindful of slugs.
  • Onions and Garlic: If you haven’t already, harvest your maincrop onions and garlic once the leaves have yellowed and flopped over. Dry them thoroughly before storing.

Autumn Fruits

Don’t forget the fruit!

  • Apples and Pears: Early and mid-season varieties will be ready for picking. Gently cup the fruit in your hand and give it a slight twist; if it comes away easily, it’s ripe.
  • Autumn Raspberries: These will continue to produce delicious fruit until the first frosts. Pick them regularly to enjoy at their best.

Looking Forward

September in the vegetable garden is a month of balance—a time for enjoying the last of the summer bounty while preparing for the seasons ahead. By clearing old crops, preparing your soil, and sowing hardy varieties, you can ensure your plot remains a source of fresh, homegrown food for months to come.

Take a moment to enjoy the crisp air and the satisfaction of a full harvest basket. Your garden has worked hard all summer, and now is the time to reap the rewards and gently guide it into its winter rest.

Further Reading: Plant Autumn Bulbs Now for a Beautiful Spring Garden, The Autumn Vegetable Garden, All About Seed Saving, All About Squashes, All About Marrows

All About Squashes

Squashes are amongst the most rewarding vegetables you can grow in your garden. These versatile plants produce bountiful harvests, offer excellent nutritional value, and provide countless possibilities for cooking, storage and creative projects. Whether you’re a seasoned gardener or just starting out, squashes deserve a place in your growing plans.

From compact courgettes to massive pumpkins, the squash family offers something for every garden size and cooking preference. You’ll discover that these plants are surprisingly easy to grow, incredibly nutritious and wonderfully versatile once harvested. Let’s explore everything you need to know about these fantastic vegetables.

What Are Squashes?

Squashes belong to the botanical family Cucurbitaceae and the genus Cucurbita. These plants are closely related to cucumbers, melons, and gourds, sharing similar growing habits and requirements.

The squash family divides into two main categories:

Summer squashes are harvested whilst young and tender, with soft, edible skins. Popular varieties include:

  • Courgettes (marrows when left to mature)
  • Patty pan squashes
  • Yellow crookneck squashes
  • Scallop squashes

Winter squashes are left to mature fully before harvesting, developing hard shells that allow for long-term storage. Common types include:

  • Butternut squash
  • Acorn squash
  • Delicata squash
  • Hubbard squash
  • Pumpkins
  • Kabocha squash

Each variety offers unique flavours, textures and uses, giving you plenty of options to suit your taste preferences and garden space.

The Origins of Squashes

Squashes have an impressive history stretching back thousands of years. Archaeological evidence suggests that squashes were amongst the first plants domesticated in the Americas, with cultivation beginning around 8000-10000 years ago in Mexico and Central America.

These hardy vegetables formed part of the “Three Sisters” planting system used by Indigenous peoples across North and South America, alongside beans and sweetcorn. This companion planting method maximised garden space whilst providing complete nutrition through complementary crops.

European explorers brought squashes back to the Old World in the 15th and 16th centuries, where they quickly spread across Europe, Asia and Africa. Today, squashes are grown worldwide and remain staple foods in many cultures.

How to Grow Squashes Successfully

Growing squashes is straightforward once you understand their basic needs. These warm-season crops thrive with proper planning and care.

Starting Your Squashes

Begin by sowing seeds indoors 4-6 weeks before your last expected frost date. Plant seeds 2cm deep in individual pots filled with quality seed compost. Keep the soil warm (around 18-21°C) and moist until germination occurs, usually within 7-10 days.

You can also direct sow seeds outdoors once soil temperatures reach at least 15°C and all danger of frost has passed. This method works particularly well for larger varieties that don’t transplant as easily.

Planting Requirements

Choose a sunny location with well-draining soil enriched with plenty of organic matter. Squashes are heavy feeders that benefit from rich, fertile conditions. Work compost or well-rotted manure into your planting area before sowing.

Space your plants generously. Bush varieties need 90-120cm between plants, whilst vining types require 180-240cm spacing. This prevents overcrowding and reduces disease problems.

Care and Maintenance

Water consistently throughout the growing season, providing about 2.5cm of water weekly. Apply water at soil level to keep foliage dry and prevent fungal diseases.

Feed your squashes regularly with a balanced fertiliser every 3-4 weeks during the growing season. Switch to a potassium-rich fertiliser once flowering begins to encourage fruit development.

Monitor for common pests like squash bugs, cucumber beetles, and vine borers. Remove any affected plant material promptly and consider using row covers early in the season for protection.

Nutritional Benefits of Squashes

Squashes pack impressive nutritional value whilst remaining low in calories. These vegetables provide excellent sources of vitamins, minerals, and beneficial plant compounds.

Winter squashes are particularly rich in beta-carotene, which your body converts to vitamin A. This nutrient supports eye health, immune function and skin integrity. One cup of cooked butternut squash provides over 400% of your daily vitamin A needs.

Squashes also contain significant amounts of:

  • Vitamin C for immune support
  • Potassium for heart health
  • Fibre for digestive wellness
  • Folate for cell function
  • Magnesium for bone health

The bright orange flesh indicates high levels of antioxidants, which help protect against cellular damage and support overall health. Summer squashes provide similar benefits with additional vitamin B6 and manganese.

Storage and Preservation Methods

Proper storage extends the life of your squash harvest significantly. Summer squashes are best used fresh but can be stored in the refrigerator for up to one week.

Winter squashes excel at long-term storage when handled correctly. Cure freshly harvested winter squashes in a warm (25-30°C), well-ventilated area for 10-14 days. This process hardens the skin and heals any surface wounds.

After curing, store winter squashes in a cool (10-15°C), dry location with good air circulation. Most varieties keep for 3-6 months under proper conditions, with some lasting up to a year.

You can also preserve squashes through:

  • Freezing (blanch pieces first)
  • Dehydrating into chips
  • Canning as puree
  • Pickling (especially good for summer varieties)

Delicious Recipe Ideas

Squashes offer endless culinary possibilities. Their mild, sweet flavours complement both savoury and sweet preparations.

Try roasting winter squash wedges with olive oil, salt, and herbs for a simple side dish. The natural sugars caramelize beautifully, creating rich, complex flavours.

Summer squashes shine in quick cooking methods. Sauté sliced courgettes with garlic and fresh herbs, or grate them into fritters for a crispy treat.

Create warming soups by blending roasted squash with stock and spices. Butternut squash soup with ginger and coconut milk makes an excellent autumn meal.

For baking enthusiasts, squash puree adds moisture and nutrients to breads, muffins, and cakes. Replace some butter or oil with an equal amount of puree for healthier treats.

Ten Creative Uses for Squashes

Beyond the kitchen, squashes offer numerous creative possibilities:

  1. Natural bowls – Hollow out large squashes to create serving bowls for autumn gatherings
  2. Bird feeders – Cut feeding holes and hang small squashes filled with seeds
  3. Planters – Use as biodegradable pots for herbs or small flowers
  4. Lanterns – Carve designs for natural outdoor lighting
  5. Decorative displays – Arrange various sizes and colours for seasonal decorations
  6. Natural sponges – Luffa gourds (related to squashes) make excellent scrubbers
  7. Craft projects – Paint or decorate for children’s activities
  8. Rattles – Dried small gourds with seeds inside create natural instruments
  9. Garden markers – Use small varieties to mark plant rows or garden sections
  10. Compost material – After use, all parts break down beautifully in compost systems

Make the Most of Your Squash Growing Adventure

Squashes reward gardeners with abundant harvests, exceptional nutrition and endless versatility. These reliable plants adapt to various growing conditions whilst providing months of fresh eating and creative possibilities.

Start small with a few plants this season, then expand your collection as you discover favourite varieties. You’ll soon appreciate why squashes have fed families around the world for thousands of years. With proper growing techniques and creative uses, these remarkable vegetables will become valuable additions to your garden and kitchen.

Further Reading: All About Marrows, The Importance of Growing Your Own Food, The Autumn Vegetable Garden

August Garden Jobs: Your Essential Vegetable Garden To-Do List

August brings peak harvest season to the vegetable garden, but there’s more to do than simply enjoy your bounty. This crucial month balances the satisfaction of reaping what you’ve sown with the forward-thinking work of preparing for autumn and winter crops. Whether you’re a seasoned gardener or just getting your hands dirty, these essential August tasks will help you make the most of your growing space.

From harvesting sun-warmed tomatoes to sowing winter greens, August offers unique opportunities to extend your growing season and maximise your garden’s productivity.

Harvest Your Summer Stars

August marks the pinnacle of the growing season, when months of careful tending finally pay off. Your vegetable garden should be bursting with colour and flavour right now.

Tomatoes at Their Peak

Check your tomato plants daily – they’re likely producing faster than you can keep up. Harvest tomatoes when they show good colour but still feel firm. Don’t worry if some are still green; they’ll continue ripening indoors on a sunny windowsill. Remove any split or damaged fruits immediately to prevent disease spread.

Courgettes and Summer Squash

These prolific producers need daily attention during August. Harvest courgettes when they’re 15-20cm long for the best flavour and texture. Regular picking encourages continued production, so don’t let them grow into marrows unless that’s your intention. If you’re overwhelmed by the harvest, consider sharing with neighbours or preserving them for winter.

Beans and Peas

French beans, runner beans and mangetout are at their most tender now. Pick regularly to keep plants productive – leaving pods to mature signals the plant to stop flowering. Early morning harvesting often yields the crispest vegetables.

Sweetcorn and Cucumbers

Test sweetcorn readiness by pressing a kernel with your thumbnail – if milky juice spurts out, it’s ready. Harvest cucumbers while they’re still relatively small and the skin feels smooth rather than waxy.

Smart Sowing for Autumn Harvests

August sowing requires strategic thinking. The shorter days ahead mean slower growth, so choose varieties bred for autumn production or quick-maturing crops that can establish before winter.

Leafy Greens for Continuous Harvests

Sow lettuce varieties like ‘Winter Gem’ and ‘Arctic King’ for crisp autumn salads. These hardy types can withstand light frosts and provide fresh leaves when shop-bought salads become expensive. Space sowings two weeks apart to ensure continuous harvests.

Spinach thrives in the cooler conditions ahead. Choose varieties like ‘Perpetual’ or ‘Giant Winter’ that can withstand harsh weather. Sow in rows or broadcast in prepared beds, ensuring good soil moisture for germination.

Oriental Greens Add Variety

August is perfect for sowing pak choi, mizuna and rocket. These fast-growing crops appreciate the cooling temperatures and can be ready in as little as six weeks. They’re excellent for stir-fries and add peppery flavours to salads.

Winter Radishes and Turnips

Sow winter radish varieties like ‘Black Spanish’ for a November harvest. These larger, stronger-flavoured roots store well and add interest to winter meals. Purple-top turnips sown now will be ready for autumn roasts and stews.

Essential Maintenance Tasks

Your established crops need ongoing care to perform their best during these crucial late-summer weeks.

Watering Wisdom

August heat can stress even well-established plants. Water deeply but less frequently to encourage strong root systems. Focus on newly sown seeds and transplants, which need consistent moisture. Mulching around plants helps retain soil moisture and suppress weeds.

Pruning and Training

Remove lower leaves from tomato plants to improve air circulation and redirect energy to fruit production. Continue training climbing beans up their supports and pinch out side shoots from cordon tomatoes above the fourth truss.

Pest and Disease Vigilance

Watch for blight on tomatoes and potatoes – wet August weather can trigger rapid spread. Remove affected foliage immediately and ensure good air circulation. Cabbage white caterpillars are active now, so check brassicas regularly and remove by hand.

Preparing for the Season Ahead

Smart gardeners use August to set themselves up for success in the months ahead.

Compost and Soil Care

Add spent crops to your compost heap, but avoid diseased material. Turn compost regularly to speed decomposition. Consider starting a second heap if your first is nearly ready – you’ll need plenty of compost for next spring.

Seed Saving Opportunities

Allow some of your best-performing plants to go to seed. Collect seeds from open-pollinated varieties of beans, peas, tomatoes and herbs. Store in paper envelopes in a cool, dry place for next year’s sowing.

Planning Winter Protection

Start thinking about protecting tender crops as nights begin to cool. Clean and check cold frames and consider which crops might benefit from fleece or cloche protection later in the season.

Making the Most of Your August Garden

August gardening rewards both patience and action. While you’re enjoying the fruits of earlier labour, the work you do now determines how well your garden performs through autumn and into winter.

Take time to observe which varieties have performed best in your conditions – these observations will inform next year’s planning. Keep detailed records of sowing dates and harvest periods to refine your timing for future seasons.

Consider preserving surplus harvests through freezing, pickling or drying. A glut of courgettes might seem overwhelming now, but you’ll appreciate having garden vegetables during the lean months of winter.

Remember that gardening is a continuous learning process. Each August brings new challenges and opportunities, whether it’s unusually dry weather that tests your watering strategy or a bumper crop that pushes your preservation skills.

Make your August garden work harder by succession planting and interplanting. Sow quick-growing crops like radishes between slower-growing plants, and replace finished crops immediately with new sowings.

Your August efforts lay the foundation for months of continued harvests. By balancing immediate harvesting needs with forward-thinking sowing and maintenance, you’ll transform your vegetable garden into a productive space that rewards you well beyond summer’s end. The satisfaction of eating home-grown vegetables in November starts with the seeds you sow and the care you provide this month.

Further Reading: Microgreens: The Perfect Addition to Your Healthy Salad, How to Grow Radishes at Home, The Joy of a Freshly Picked Home-Grown Tomato, How to Create Raised Beds for Your Garden, When and How to Thin Your Fruit Trees

How to Choose Which Chilli Plants to Grow

Chilli plants add a vibrant pop of colour to your garden while delivering a fiery kick to your recipes. The best part? There’s a variety for every gardener, from mild and sweet to tongue-tingling hot.

Understanding Growing Conditions for Chillies

Chilli plants thrive in warm climates, making them a fantastic choice for greenhouses, warm windowsills or sunny patios. Here’s what you need to keep in mind:

  • Temperature: Chillies prefer a warm environment, ideally between 18-30°C (64-86°F).
  • Sunlight: Chilli plants need at least 6-8 hours of sunlight daily. A sunny windowsill, greenhouse or polytunnel is perfect.
  • Watering: Keep the soil consistently moist but well-drained. Avoid overwatering, as it can lead to root rot.
  • Fertiliser: Use a potassium-rich fertiliser during the flowering stage to encourage fruit development.

Popular Chilli Varieties to Grow

1. Scotch Bonnet

  • Heat level: Very hot (100,000–350,000 SHU)
  • Flavor: Fruity, tropical
  • Best for: Caribbean dishes like jerk chicken or spicy salsas
  • Growing note: This heat-loving variety flourishes in greenhouses or containers. Ensure consistent warmth and watch it thrive.

2. Habanero

  • Heat level: Extremely hot (100,000–350,000 SHU)
  • Flavor: Sweet, citrusy
  • Best for: Homemade hot sauces, marinades or chutneys
  • Growing note: Similar to Scotch Bonnets, Habaneros prefer warm, sheltered growing spots. Ideal for greenhouse cultivation.

3. Cayenne

  • Heat level: Medium-hot (30,000–50,000 SHU)
  • Flavor: Tangy, earthy
  • Best for: Drying into spices or adding to soups and stews
  • Growing note: A versatile chilli that’s easy to grow in pots or directly in the garden. Perfect for beginners.

4. Jalapeño

  • Heat level: Mild to medium (2,500–8,000 SHU)
  • Flavor: Crisp, slightly sweet
  • Best for: Pizzas, nachos or pickles
  • Growing note: Jalapeños are highly adaptable.

5. Hungarian Hot Wax

  • Heat level: Mild to medium-hot (5,000–10,000 SHU)
  • Flavor: Sweet, tangy
  • Best for: Stuffing, roasting, or grilling
  • Growing note: A fantastic option for cooler climates. It’s quick to mature and perfect for outdoor or container growing.

6. Cherry Bomb

  • Heat level: Mild to medium (2,500–5,000 SHU)
  • Flavor: Sweet, juicy
  • Best for: Pickling or adding to salads
  • Growing note: Compact and productive, these are great for small spaces.

7. Fire Basket

  • Heat level: Medium (15,000–30,000 SHU)
  • Flavor: Spicy, smoky
  • Best for: Garnishing dishes or creating spicy oils
  • Growing note: A decorative chilli perfect for hanging baskets and small pots.

8. Prairie Fire

  • Heat level: Medium-hot (70,000–80,000 SHU)
  • Flavor: Sharp, fiery
  • Best for: Adding serious spice to stir-fries and curries
  • Growing note: Compact and ornamental, this variety thrives in small containers. Perfect for brightening up a windowsill.

Tips for Choosing the Right Chilli Variety

  • Taste preferences: Do you love fiery dishes, or prefer milder flavors? Choose your variety based on your tolerance for spice.
  • Space available: If you have limited space, opt for compact varieties like Fire Basket or Prairie Fire.
  • Cooking uses: Match the variety to how you’ll use them in the kitchen—mild Jalapeños for nachos or hot Scotch Bonnets for sauces.
  • Growing experience: Beginners should start with easier-to-grow options like Cayenne or Hungarian Hot Wax before trying more demanding varieties like Habanero.

Bring the Heat to Your Garden

Chillies are an exciting to grow, whether you’re a novice gardener or a seasoned green thumb. With so many varieties to choose from, you can select the perfect plants to match your space, taste and culinary aspirations.

Once you harvest your chillies, experiment with pickling, freezing, or drying them to enjoy the fruits of your labor year-round. Happy growing!

Further Reading: The Fiery World of Chillies What Gives Them Their Kick, Chilli Plant Care from Sowing Seeds to Overwintering , How to Preserve Chillies and Extend their Shelf Life

Take a look at our Great Range of Grow Your Own Seed Sets

How to Direct Sow Seeds for a Thriving Garden

Direct sowing is a low-cost and rewarding technique for planting seeds directly into the soil, skipping the indoor growing stage. If you’re a gardening enthusiast or looking for sustainable, natural ways to cultivate your own greens, this method is perfect for you. It’s simple, eco-friendly, and brings you closer to nature—no fancy equipment necessary.

Here’s everything you need to know about direct sowing, from prepping your soil to thinning out seedlings for a healthier, bountiful garden.

What is Direct Sowing?

Direct sowing is the practice of planting seeds straight into your garden or outdoor soil, right where you want them to grow. It’s ideal for plants with hardy seeds or those that don’t like being disturbed, such as carrots, beans, radishes and sunflowers. This method relies on nurturing seeds naturally in their environment, which means no transplant shock and often quicker establishment.

Not only does direct sowing make gardening accessible to beginners, but it’s also a budget-friendly, sustainable choice since it avoids plastic trays, pots or excessive supplies.

How to Direct Sow Successfully

Gardening with direct sowing does require some planning and proper techniques to achieve the best results. Follow these steps to set yourself up for success:

1. Soil Preparation

Healthy soil is the foundation of any growing process—but it’s particularly crucial for direct sowing. Follow these steps to prepare your soil:

  • Clear the Area: Remove weeds, debris and large rocks from the chosen planting area. Weeds can compete with your seedlings for water and nutrients.
  • Loosen the Soil: Use a hoe, rake or gardening fork to cultivate the soil to a depth of 6-12 inches. Loosening improves aeration and makes it easier for young roots to establish.
  • Amend the Soil: Mix in compost or organic matter to enrich the soil with nutrients. Many seeds thrive in well-drained, nutrient-rich substrates.

Tip: Avoid compacted soil—seeds germinate poorly in dense, hard soil.

2. Seed Spacing

Proper seed spacing is vital to avoid overcrowded plants, as spacing ensures healthy growth and allows airflow. Always check the seed packet or label for specific spacing recommendations as different plants have unique requirements.

  • Make Furrows or Holes: Use a stick or your finger to create planting furrows or small holes at the recommended depth.
  • Plant Sparingly: Don’t scatter seeds randomly; place seeds deliberately based on the spacing suggested. It often helps to use a ruler or a string as a guide.

If you’re after neat rows, draw straight planting lines across your soil bed before sowing.

3. Watering & Caring for Seeds

Once your seeds are planted, water them gently to ensure they’re in good contact with the soil. Use a watering can with a soft spray attachment to prevent displacing the seeds. Keep the soil consistently moist—but not waterlogged—through the germination period.

A layer of mulch or straw can be added to help retain moisture and regulate soil temperature, but ensure it doesn’t smother the seeds.

4. Thinning Seeds

After germination, you may notice clumps of tiny seedlings popping up in your soil. Thinning is the process of removing overcrowded seedlings so the healthiest ones have room to thrive. Overcrowding leads to weak, spindly plants that don’t flourish.

  • Use small scissors to snip off extra seedlings at their base. Avoid pulling them out—you risk disturbing your remaining plants’ roots.
  • Maintain the strongest seedlings based on the recommended spacing guidelines. Give them room to stretch and spread out.

Common Challenges to Address

While direct sowing is incredibly rewarding, you may encounter a few common issues:

  • Pests: Birds and insects love feasting on seeds. Use fine netting or plant covers to protect them during early stages.
  • Weather: Sudden frost or excessive rainfall can be tough on seeds. Plan your sowing around optimal weather conditions for the plant variety.

Why Choose Direct Sowing?

Direct sowing is more than just a gardening method—it’s a step towards sustainability. By growing food and plants directly in your garden, you save on waste, avoid unnecessary packaging, and support the natural lifecycle of your local ecosystem. You also learn to work in harmony with your environment, fostering a deeper connection to the earth.

Even if you’re new to gardening, direct sowing is a rewarding way to get started without feeling overwhelmed. With time, you’ll develop a knack for knowing your soil, weather, and plant needs.

Final Thoughts

Direct sowing is a straightforward, hands-on gardening method that lets you cultivate vibrant, healthy gardens with minimal tools. From soil prep to thinning, following these steps will give your seeds the best chance to thrive.

Take a deep breath, dig in and enjoy the process of nurturing life from seed to harvest. Nothing tastes better than food grown by your own hands!

Further Reading: Why Choose Sow It Grow It and Feast, How to create a Foragers’ Garden

Take a look at our Great Range of Grow Your Own Seed Sets

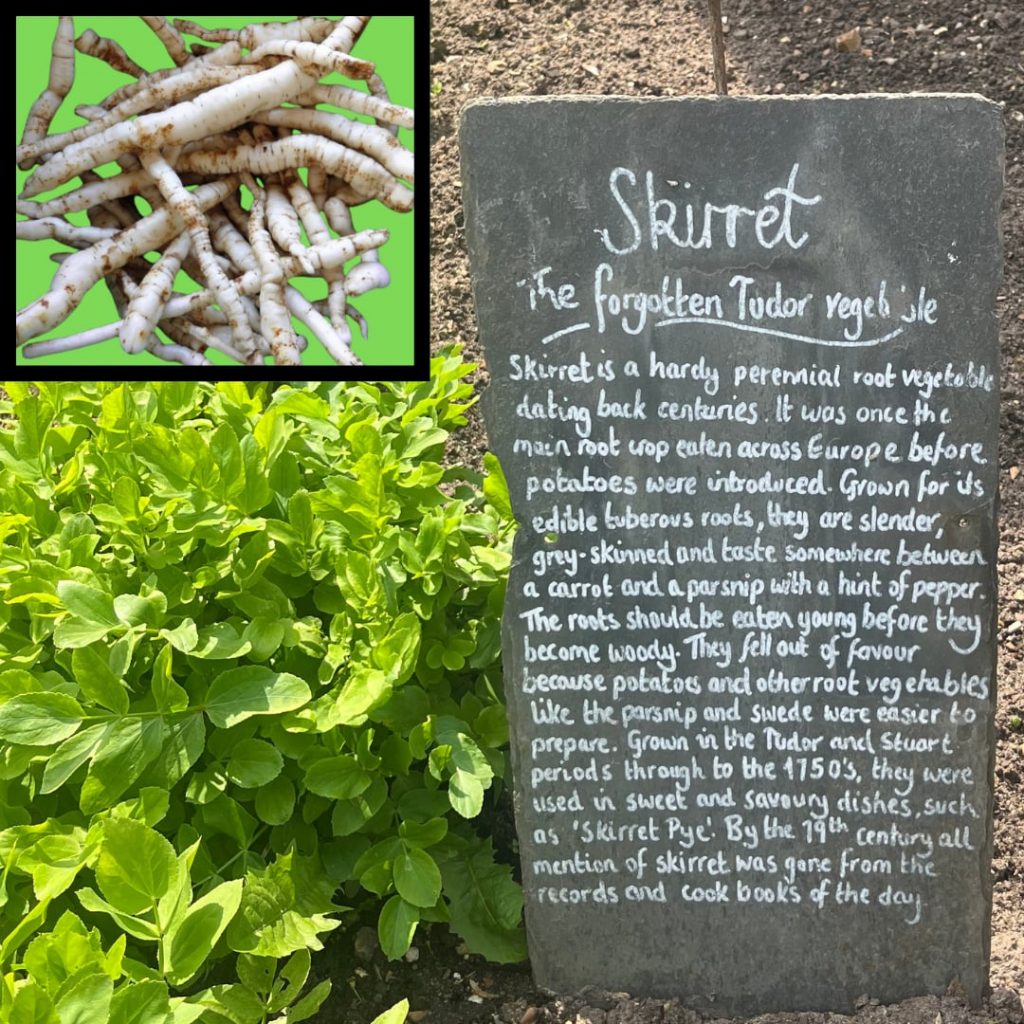
Skirret – The Forgotten Vegetable – Herbaceous Perennial

Sium sisarum   – Skirret  Other common names: crummock, jellico

Skirret, a starchy root vegetable that belongs to the carrot family, was once a popular crop in Europe during Roman times. The Emperor Tiberius was particularly fond of it, and even demanded it as a tribute from the Germans.  It was the main root crop eaten in Europe before the potato was introduced. Skirret has a unique taste between a carrot and parsnip and can be found in sweet and savoury dishes. The name “skirret” is derived from a Germanic origin meaning “sugar root”.   However, despite its popularity in the past, skirret has faded from gardens and tables over time.

Skirret – The Forgotten Vegetable – Herbaceous Perennial Image of the plant, vegetable and chalkboard gardeners notes

Skirret is a vegetable that is quite easy to grow once you know how. Unlike most of its relatives, it is a perennial plant that produces a bunch of roots, making it easy to lift and replant. Skirret can be grown from seed and produces a single “crown” consisting of several shoot buds around the base of a stem, with a cluster of roots attached. To form a clump made from several crowns, a crown can be divided easily. However, some of the roots in a cluster are not worth picking, so it’s best to dig up the clump, snip off the roots that are worth having, and replant.

Skirret roots can sometimes have a woody core that can’t be softened even after prolonged cooking. This issue is more common in young plants but may disappear as they grow older. It can also be caused by insufficient water during the growing period. Alternatively, it may be due to genetic factors that vary from plant to plant.

Another yield from skirret is the immature flower stems, which have a nice carroty taste when boiled or steamed. They are fairly substantial and produced in reasonable volume, but they are fast-growing and soon harden off, so if you want more than a brief harvest you will have to freeze some.

Skirret can be grown from crowns, but it’s not easy to obtain them. You either have to spend a lot of money or start from seed. Skirret is not easy to grow from seed because it needs a period of winter cold to germinate. If you’re planning to grow Skirret from seed, make sure you source current-year seed in the autumn and stratify it right away. The seed loses viability quickly, like many plants in the Apiaceae family.

Follow us on Instagram for Daily Inspiration🧡

Further Reading: The Benefits of Growing your own Food